10.07.2011

Gothic Glam--Chunky Charm

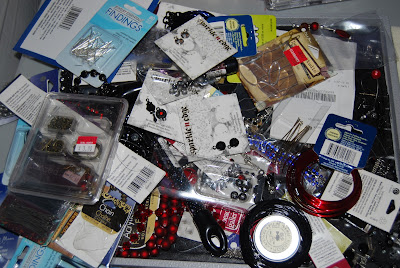
I joined a chunky charm swap on the Cricut Message Boards a while back and this is the result... I went from this mess of components:
To this finished charm:
And this is how I did it!

The photo is a layout of all of the individual pieces and below is the text that explains where the components came from and how I assembled them all together!

Individual components of the charm, I used various colored pins (black, silver and gunmetal) to create the components for a mixed metal look:

1. Tim Holtz Swivel Clasp (small size used)

2. Gunmetal Jump Rings

3. Black Jump Rings

4. Gold Jump Rings

5. Tim Holtz small gear cut from Gadget Gears die in shrink dink color 1” square in black, , the large pump ring is from Michael’s

6. A. Negative from thread cut from Tim Holtz die Sewing Room of the thread spool cut from 1”x2” shrink dink in black, 3 additional holes added with Crop-a-Dile in smallest hole setting. After shrinking this was wrapped with silver 24g wire
B. Positive cut from Tim Holtz die Sewing Room thread spool in black shrink dink, wrapped with red 20g wire
C. Earing finding from kit at Wal-Mart with attached beads from Michael’s.

7. A. Tim Holtz Hanger Clip
B. Misc. Beads from Wal-Mart
C. Sparkle n Edge gemstone from Wal-Mart

8. Flat bezel from JoAnn (Blue Moon) and attached beat from Wal-Mart

9. Tim Holtz small gear cut from Gadget Gears die in shrink dink color 1” square in black, the large pump ring is from Michael’s

10. A. Beads from Wal-Mart
B. Bead from Wal-Mart
C. Flat back mounted rhinestone from Sparkle n Edge at Wal-Mart

11. Red rhinestone chain from Rebel Shine at Wal-Mart (Came with the clip to set the rhinestone in to attach the chain to something else, you simply cut it to length and then squeeze on the provided clip.)

12. Beads from Wal-Mart

13. A. Negative black shrink dink from gear cut in 5 or 9 with the excess from the 1” square trimmed to a circle and a small hole punched in it with the Crop-a-Dile and shrunk
B. Tim Holtz Film Strip Ribbon, single frame with a rhinestone from Wal-Mart’s Sparkle n Edge collection attached
C. Beads from Wal-Mart

14. Flat back mounted rhinestone from Sparkle n Edge at Wal-Mart

15. A. Positive cut from Tim Holtz die Sewing Room thread spool in black shrink dink, wrapped with silver 24g wire
B. Charm from Rebel Shine at Wal-Mart

16. Tim Holtz Trinket Pin with 3 beads on the clip

17. A. Bead from Michael’s
B. Key charm from Wal-Mart

18. Blue rhinestone chain from Rebel Shine at Wal-Mart (See 11 for more details.)

19. Bead from Michael’s

20. A. Earing finding from Wal-Mart
B. Crystal from Michael’s

21. Rhinestone from Wal-Mart’s Sparkle n Edge collection

22. Beads from Wal-Mart

23. Beads from Michael’s

24. A. Bead from Michael’s
B. Tim Holtz Film Strip Ribbon, single frame
C. Flat back mounted rhinestone from Sparkle n Edge at Wal-Mart

25. A. Beads from Wal-Mart
B. Negative from thread cut from Tim Holtz die Sewing Room of the thread spool cut from 1”x2” shrink dink in black, 3 additional holes added with Crop-a-Dile in smallest hole setting. After shrinking this was wrapped with purple 24g wire
C. Beads from Wal-Mart
D. Bead from Wal-Mart

26. Flat back mounted rhinestone from Sparkle n Edge at Wal-Mart

27. A. Beads from Wal-Mart
B. Maya Road mini Wooden Spool wrapped with 18g purple wire with silver beads added for accents at both ends.
C. Filigree connector from Rebel Shine at Wal-Mart and all attached beads, metal, pear and crystal from Michael’s

28. Tim Holtz dress form cut from Sewing Room die on rough-n-ready Shrinky dink, with raspberry, and silver Bic Mart-it accents and stamped with zigzag pattern and “It’s your style” rubber stamps before shrinking with a hole at the top from the Crop-a-dile


Order to attach charms to the swivel clasp (1) use any color jump ring from piles 2, 3, 4 (I prefer to start at the bottom)
BR (Bottom ring) attach 16, 17, 18
L9 (Link 9) attach 15, 19
L8 (Link 8) attach 14, 20
L7 (Link 7) attach 13, 21
L6 (Link 6) attach 12, 22
L5 (Link 5) attach 11, 23
L4 (Link 4) attach 10, 24
L3 (Link 3) attach 9, 25
L2 (Link 2) attach 8, 26
L1 (Link 1) attach 7, 27
TR (Top Ring) attach 5, 6, 28


I hope you enjoyed my chunky charm and will come back soon to check out it's matching dressform (Coming soon!).
If you have any questions please let me know!!!!
6.26.2011

Red, White and Blue!


The only cartridge I used was Mother's Day Bouquet.  I used a smooth Styrofoam ball and inserted and hot glued in a dowel rod.  Depending on the colors that I use for the flowers I sometimes also paint the Styrofoam ball to match, in this case I just left it white.  For each assembled flower I used a pin, a button, a 1" cut flower, a 1.5" cut flower and a 2.25" cut flower per assembled flower to get them to look stacked the way they are.  (These sizes were also perfect to cut 16 of each size out of a piece of 12" x 12" card stock.)  I simply folded and curled the petals to give them a  3D look from flat paper.  Before sticking the pin into the Styrofoam ball, I did add a bit of glue to the pin so that it would stay in the Styrofoam better.  I just used regular glue, nothing special.  After I had the entire Styrofoam ball covered I stuck it in a piece of floral foam stuck in the bottom of the pail and hot glued it in.  I then covered the rest of the foam in the pail with little stones just to finish off the look.  I tied a ribbon around the dowel rod, just for a little decoration. 
Supplies:
*2 Sheets each red white and blue 12" x 12" card stock (this will yield extra flowers for a future project)
*1 1/4" Dowel rod, cut to about 15" long 
*~ 50 Total red, white and blue buttons 
*~50 White pearl head pins (You can use whatever color you want)
*1 6" smooth Styrofoam ball (I purchased mine at Jo Ann with a 50% off coupon)
*1 pail (I've purchased at Michael's for a larger size or Target's $1 spot for smaller ones.)
*A small block of floral foam
*Decorative stones for pail
*~12" of ribbon for bow (I used red 1/2" ribbon)
*Optional paint and paintbrush to paint Styrofoam ball
*Cricut Mother's Day Bouquet Cartridge
*Cricut Expression with mats and blades


11.18.2010

Christmas Ornament


     • Cricut Cuts:


          o 2” Oh Christmas Tree from Winter Woodland


          o 1” Blue Birds, 1 regular, 1 flipped from Winter Woodland


          o Window from October 31st, cut to size just over 5” in Design Studio


     • Back is embossed with Cuttlebug Snowflakes Folder and inked with white pigment ink


     • Lace Tree ornament design was purchased from EmbroideryLibrary.com and adorned with
        I-Rock gems


     • All paper is DCWV


     • Oh and Tree were Stickled with Lime Green
    
     • White on Blue Birds and Eyes were drawn on with Gelly Roll Pens

11.03.2010

A Cricut Cake has a New Home!

I got a Cricut Cake on Super Sale at Michaels over the weekend, and this is my first project!  I'm super excited about getting to try more things and more mediums.  These are just cupcakes frosted with white frosting and with red and brown leaves from Stretch Your Imagination, cut at 2", and layered onto the wet frosting... The ones with red on top are chocolate cupcakes, and the ones with brown on top are funfetti cupcakes. 

9.25.2010

Glittery Pumpkins!

So last year on he Cricut message board it was all the rage to make these awesome glittery ornaments for Christmas trees.  Well, I decided to make them pumpkins! 
I found these awesome smooched circle ornaments at Michael's while shopping today, and Rita thought they would be perfect for pumpkins!  So I purchased a few packages.... now for the details....
Side 1
Required supplies:
Clear glass ornaments
Pledge future floor wax
Fine glitter (I used Martha Stewart Fire Opal)
Oracle 631 vinyl in black (What you can buy from Provo Craft)
Saran wrap or paper towel
Cricut Expression (Or baby bug or create)
Pumpkin Carvings Cricut cartridge

Step 1: Remove the top from the ornament, set aside.  Squirt some of the pledge floor wax in the ornament and take the paper towel or saran wrap over the opening, and shake so the wax covers the inside of the ornament.  Drain excess wax back into the original bottle.
Step 2: Pour glitter into ornament, be sure you have enough, you can tap out the extra later.  Place the paper towel or saran wrap over the opening in the ornament and shake vigorously so the glitter covers the inside of the ornament.  Remove paper towel and tap out excess.  Replace ornament top. 
Step 3: Load black vinyl into your Cricut and cut faces from Pumpkin Carvings.  (I laid mine out in Design Studio to minimize waste of vinyl, they were done at 3" with the outside contour hidden to save more vinyl.)  Use transfer tape to place the cut faces on the ornaments, I put a different face on each side, just to mix things up. 
Step 4: ENJOY! 
Side 2! 

9.12.2010

Fall Spider Card

This is for this weekend's Cricut Circle contest, the theme was to make a fall card or layout.
*The background card paper is Core'dinations from the black Magic Collection, black on the front, and orange underneath. 
*The paper the tree is mounted on is from the DCWV Rustic Stack. 
*The paper the tree is cut from is from the scrapbook kit in a stack by DCWV (2007?) cut with Happy Hauntings.
*The leaves are from the fall adhesive cardstock matstack by DCWV (2008/9?) cut with Stretch Your Imagination inked with the ColorBox Classic Pigment Cat's eyes.
*The Beware was written in gel pen on paper from the Midnight Spell paper by DCWV, with the beware and sign from October 31st. 
*I used another pieces of the same Rustic stack paper to print the setiment and used the Martha Stewart PATP spider web set for the top and bottom edges. 
*The spider on the front is only tied on so that it can be taken off and used as a Halloween decoration for the recipient.  I made it using instructions similar to those in the Halloween Tricks and Treats (2010) published by Better Homes and Gardens.

7.11.2010

Totally Crazy

Well I haven't psted a new project in almost a year.. not that I haven't done a bunch, but between taking a full time position at work and finishing my MBA, I just take photos and go "Oh, I'll have to upload that!"  and well, it just hasn't happened : ( 
Anyhow, I thought I'd let everyone know about an awesome give away over on Kricut Krazy for one of the new fall mini cartridges, Pumpkin Carving.  Check it out here >> http://www.kricutkrazy.com/search/label/Pumpkin%20Carving

Happy Cricuting!